Friday, April 29, 2011

Sweet and Spicy Green Beans

These Chinese style green beans have a secret ingredient: honey. We know the importance of honey in the Sunnah; the Prophet (s) loved honey, and he used it to cure many ailments including stomach illness. He advised a man who had stomach issues to take honey. The man returned to him and told him that his stomach was still hurting, and the Prophet was so confident in the healing power of honey that he told the man that his stomach was lying to him. I was also told that eating local honey (honey made from bees in your local area) is a great way to build your immune system against local allergens. I try to eat a teaspoon of honey everyday. I really feel the difference when I eat it consistently. I use honey instead of syrup on my waffles, and I sometimes put honey in my tea. When I have a sore throat, I take a spoon full of honey with a couple drops of lemon juice and sprinkle a little black pepper on top. My brother unpeels a whole banana, puts it on a plate, and drizzles it with honey and eats it with a fork!

My husband, on the other hand, still needs to warm up to honey. When he was sick, I used to have to shove the spoon in his mouth in order for him to take honey. I got the Sue Bee Pure Clover honey from Sam's club and he seems to like it a lot better. The texture is not as thick and viscous as other honey. If you don't like the taste or texture of honey, this is a great way to hide it in your food, and it adds a nice flavor!

Ingredients:

Green beans, washed
1 medium red onion, thinly sliced
2 tbsps honey
2 tbsps soy sauce
2 tbsps of your favorite hot sauce (I used chili garlic sauce)
2 tbsps olive oil
1/2 tbsp garlic ginger paste

1. Set a pot of water to boil. Cut the stems off the green beans and cut them in half. Boil green beans for 15 minutes.

2. Meanwhile, heat oil in a medium pot or frying pan. Fry garlic and ginger paste and onions until onions are translucent.

3. Drain green beans and add to onions. Add in the other sauces and honey and cook on medium for another 10 minutes, or until green beans are tender. I don't like to cook green beans until they are too soft and mushy, I like them to have some firmness to them.


Monday, April 25, 2011

Pesto Chicken Pasta


I love basil! Basil has such a strong aroma and adds an amazing kick to anything you put it in. You can add it to salads, put it in paninis, and garnish pasta. This was my first time making pesto chicken pasta and I just knew that I would fall in love with it because this recipe uses basil as one of the main ingredients for the pasta sauce.


Ingredients:

1 pound of grilled chicken cubes, from previous post
2 cups rinsed basil
1/2 to 1 cup pine nuts (or walnuts)
4-5 cloves garlic
3/4 cup grated Parmesan cheese
3/4 tbsp salt 
2 cups olive oil
1 box Penne pasta, whole grain
optional: 2 green chillies and some red chili powder


The night before:

1. Grill 1 lb boneless chicken and cut into small cubes if you haven't done so already from the previous recipe. While the chicken is grilling, move on to the next step.

2. Heat a frying pan over medium heat and lightly toast the pine nuts until they are golden. Pine nuts are expensive, so you may also use walnuts, although I've never tried it. Stir frequently. Don't walk away from the nuts while they are toasting. I always make that mistake and I end up burning them. 

3. Blend together basil, pine nuts, and garlic cloves in a food processor. The basil already adds a zesty flavor to the sauce, but for an extra kick, blend in 2 green chillies and 1/2 tsp red chili powder. Don't worry, it doesn't make the sauce too spicy.

4. Add the Parmesan cheese, salt, and some of the olive oil; blend well. Keep adding the olive oil little by little and blending to the consistency you like. If you want a thinner sauce, add more oil. You shouldn't have to use the entire 2 cups, I used only about 1 cup.


5. Save chicken and pesto sauce in separate containers and place in the refrigerator overnight.


After work:

6. Boil the *whole grain* Penne pasta, following the directions on the box. If you haven't tried whole grain pasta, you can barely taste the difference from white-flour pasta. I used Barilla whole grain pasta. Higher in fiber, lower in carbs.

7. In a pot over the stove, mix pasta with pesto sauce, adding only a little at a time until pasta is well covered in sauce. Warm up chicken and mix in to the pasta. Serve warm and enjoy!


8. You should have plenty of pesto sauce left over. You can save it in the refrigerator for later on in the week, or keep it in the freezer for next month. I used less than half of the sauce that was made with this recipe.


Wednesday, April 20, 2011

Chicken Salad Sandwiches


I grilled about 2 pounds of boneless chicken cubes on my grill pan. I just marinated it in olive oil, salt, pepper, and lemon juice before putting it on the grill pan. You can use this chicken all week to make different lunch meals. 


You can boil some pasta, top with spaghetti sauce and mix in the chicken. Or, you can make a nice big salad with baby spinach, carrots, bell peppers, cucumbers, toasted sesame seeds, pecans, craisins, and feta cheese, and toss in the chicken pieces. Yes, I go all out with my salads and I love it. Make sure you pack the grilled chicken separately so that you can warm it up before mixing it into your salad. I could eat it for dinner too, but that probably wouldn't fly with the husband.


Ingredients:

1/2 pound grilled chicken, dice into smaller pieces
2 stalks celery, chopped
1/2 cup mayonnaise 
1 tbs honey Dijon mustard (make sure there is no white whine in the ingredients)
salt and pepper, to taste
slices of your favorite bread, I use honey wheat bread
lettuce


1. Mix the chopped chicken, celery, honey Dijon mustard, salt, and pepper, and mayonnaise in a large bowl. Add the mayonnaise last and mix in little by little until you get the consistency of your liking.

2. Lightly toast the bread in a toaster oven. I do this to keep the bread from becoming soggy overnight and the next day before lunch. You can always slap on the chicken salad mixture on the bread in the morning, but I'm not a morning person and I like to grab all my things and run out the door.

3. Spread a generous amount of chicken salad one slice of bread. Top with lettuce, cut sandwich diagonally, and wrap tightly in aluminum foil. 

4. Refrigerate over night. 

You can make a larger amount of chicken salad and save the rest to make sandwiches one or two days later. Perfect for lunches and picnics!


Monday, April 18, 2011

Strawberry, Banana, and Nutella Crepes

I have been obsessed with crepes ever since a friend invited me for breakfast and made strawberry and Nutella crepes. I still haven't eaten crepes as good as the crepes I ate that day.

Ingredients:

1 package strawberries, washed and cut
3 bananas, sliced
1 box crepe mix (I usually use the Barefoot Contessa mix from Crate and Barrel, however this time I tried using a cheap mix I bought from Ross and it turned out just as good)
1 jar Nutella
1 can whipped cream
additional ingredients called for by crepe mix (usually eggs, butter, and water)

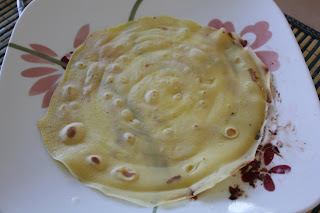
1. Follow directions on crepe mix box. Batter should be on the thinner side, so add a little water if too thick. Mix well.

2. Brush or spray a sautee pan with vegetable oil and heat on medium.

3. Pour about 1/2 cup of batter on heated pan and swirl/spread batter around using the back of a plastic bunch bowl spoon until batter is very thin. Work your way from the center outwards, moving in swirls. Crepes shouldn't be as thick as pancakes. If you have ever made or eaten dosas before, then you know what I'm talking about. Except crepes shouldn't be crispy like dosas.

4. When the batter looks dry, flip over using a spatula. You can also tell when its ready to be flipped by peeking at the bottom of the crepe; it should be barely golden brown with maybe a few brown spots here and there.

5. Cook the other side of the crepe until barely golden as well. Crepes should be soft and may seem slightly undercooked.


6. Cover crepes in aluminum foil until you are finished making all of the batter.

7. Spread a generous amount of Nutella on the crepe. Fill with strawberries and banana slices. You may choose to top with powdered sugar and whipped cream, but they are just as delicious without. Why have the extra calories?


8. Roll crepe and enjoy! Eat with a fork. 


Cherry Blossom Cupcakes

My husband and I had our favorite couple visiting us from New York this past weekend. Us girls had been planning to see the Cherry Blossoms ever since we missed the blossom when the couple visited us last year. Unfortunately, they came a little too late this year. The hubby and I went to see them just two weeks ago when they were at their prime, but they don't last long. We still had an amazing time hanging out and spending the Sunday in D.C. and shopping in Georgetown. Saturday night we decided to make cupcakes together. We made Cherry Blossom inspired cupcakes with Yellow cake mix, white vanilla frosting, and pinkish sprinkles.


These are some pictures my husband and I took when we visited the Cherry Blossoms on April 3rd.


Monday, April 4, 2011

Death by Chocolate


Ingredients:

1 pack brownie mix, slightly undercooked
2 packs chocolate pudding mix, follow directions on box
4-5 Heath bars, crumbled
1 can whipped cream


My nephews love to watch me cook. They drop whatever they are playing with and come running to watch what I'm doing and beg to help me. Two of my nephews were over and they were fighting with each other. I decided to put them to work and had the older one make the brownie mix and had the little one mix the pudding, even though he kept sticking his finger in it and tasting.

1. Crumble half the brownies into small pieces and evenly spread in the bottom of a deep serving dish.
2. Spread a layer of chocolate pudding over the brownie crumbs, only using half of the pudding.
3. Spread a layer of crumbled heath bar, only using half the amount you have.
4. Repeat, spreading the remaining of brownie, chocolate pudding, and heath bar.
5. If you are pretty sure your dessert is going to be finished by the end of the night, spread a layer of whipped cream before the last layer of crumbled heath bar. I didn't apply the whipped cream because I knew I would be eating this over a period of 2-3 days, and the whipped cream would melt and make the dessert watery. Serve whipped cream on the side.


Grilled Chicken Quesadillas

My mom came over on Saturday to have a mother-daughter hang-out session. Grilling the chicken and making the quesadillas were so quick and simple that I could spend more time with her and less time in the kitchen. I was also excited because I got to use my new grill pan.

Grilling the chicken:

4 chicken breast halves
1/2 tbsp olive oil
3 tbsp lemon juice
1-2 tbsp garlic and ginger paste
salt and pepper

1. Marinate 4 chicken breast halves in olive oil lemon, ginger and garlic paste, salt, and pepper. You may choose to marinate for 30 minutes, but I didn't have time to let it sit. If you want spicy quesadillas, add less lemon juice and mix in some hot sauce and red chili powder.
2. Heat grill pan on medium.
3. Grill chicken on pan, about 7 minutes on each side or until chicken turns white and you can see nice brown looking lines from the grill marks. Cut chicken in half to make sure it is completely cook and there is no more pink remaining.
4. Allow chicken to cool and chop into cubes.


Making the Quesadillas

Tortillas (pack of 10)
shredded cheddar cheese
1/2 bunch spring onions, chopped
1 red bell pepper

1. Lightly brush olive oil onto one side of a tortilla. This will be the outside. Turn tortilla over to the ungreased side.

2. Fill half the tortilla with chicken, green onions, red bell pepper, and plenty of cheese. You may choose to add other fillings such as corn, salsa, hot sauce, or sour creme. I prefer to keep my quesadillas thin and simple. Too many fillings cause them to be messy when grilling and eating. I keep sour cream on the side for dipping.


3. Fold the quesadilla over in half.

4. I have a panini griddle that I used to make my quesadillas. I prefer to use it over the grill pan because in addition to giving grill lines, it presses the quesadillas into a thinner size, and it cuts the cooking time in half because both sides of the quesadillas are being grilled at the same time. If you are using the grill pan, press it down with a spatula and cook evenly on both sides, about 5 min eahc, or until golden and nice grill lines show. I prefer my quesadillas well done and crisp.


5. Cut into fourths and serve with sour cream and hot sauce!


Saturday, April 2, 2011

Do you own a grill pan?

I just bought a grill pan, and I can't wait to use it!


Calphalon Grill Pan, 11" Contemporary Nonstick Square


I've been thinking of buying one for a while now, specifically to grill boneless chicken for salads and pastas. I usually cook boneless chicken over the stove in a pot. I have read that grill pans are great for more flavorful food, and of course it gives your food grill marks that are pleasing to the eye. They're great for grilling indoors without the hassle of having to fire up the grill outdoors. Now so many other things are coming to mind: steak, veggies, fish. Now I'm thinking to myself, why didn't I think of buying this before?

Will post updates and pictures of what I make.