Sunday, September 22, 2013

Original Buffalo Chicken Wings


Football season is upon us! And there's nothing better than a hot batch of original Buffalo style wings to go along with your game day meal. Actually, there is one thing that could make it better: not having to deep fry your wings. Yup, you can bake your wings and have 'em crispy too! Less work and healthier! I got this amazing recipe from Chef John's Food Wishes blog.


Ingredients:

5 pounds chicken wings
salt and fresh ground black pepper to taste
2/3 cup and 3 tbsp Frank's hot sauce
2 tbsp veg oil
1 cup flour
1 stick (1/2 cup) cold unsalted butter
1 1/2 tablespoons white vinegar
1/4 teaspoon Worcestershire sauce
1/2 teaspoon hot sauce (any)
1/4 teaspoon cayenne pepper
1/8 teaspoon garlic powder


1. Cut the wing into three pieces by making one cut between the drum and flap, and a second cut to take the tip off. No need to cut through bone, it is a hinge joint so you can cut in between the joint space after you open and close it and feel for the space (yikes the PA in me is coming out). Throw the tips away or save them for soup.This for me is the most annoying step. It gets better.


2. Preheat oven to 400 degrees. Season chicken with black pepper and salt and 3 tablespoons of Frank's hot sauce. I used Frank's Buffalo wing style hot sauce. Add in 2 tablespoon of vegetable oil and give it a nice toss. 


3. Put 1 cup flour in a large zip lock bag or garbage bag, dump in the wings, seal the bag tightly and give it a nice shake until all the chicken is coated nicely or "dredged" with flour. 


4. Cover a baking tray with aluminum foil and coat with oil and sprinkle lightly with flour. Place the chicken spaced out evenly on the pain and spray with vegetable oil. This will give it the crispy texture once it is baked. 


5. Bake at 400 degrees for 30 minutes on each side. 


6. During the second 30 minutes, put together the rest of the ingredients (stick of butter, Frank's hot sauce, other hot sauce, white vinegar, Worcestershire sauce, cayenne pepper, garlic pepper, and a pinch of salt) in a pot over medium heat. Whisk until the butter melts and simmers. Turn off the heat as soon as the mixture begins to bubble. This is enough sauce for 4-5 pounds of chicken. 


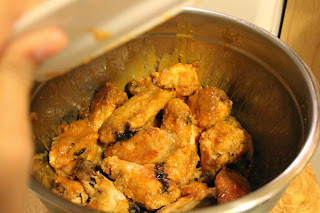
7. Place the chicken in a stainless steel bowl and pour the wing sauce over it. Cover the bowl with a plate and shake the bowl until all the wings are coated evenly. Do not mix with a spoon! 


8. Serve with blue cheese or ranch dressing and celery sticks. Enjoy! 


Saturday, October 27, 2012

Oven Roasted Broccoli


I am really loving recipes from Alton Brown. Here is another one of his recipes that turns something that is usually boring and bland into something so delicious. The texture is just perfect. My husband almost didn't realize he was eating broccoli.


Ingredients

1 pound broccoli
2 tablespoons olive oil
2 cloves garlic, minced
1/2 teaspoon salt
1/4 teaspoon ground black pepper
1/3 cup bread crumbs (seasoned Italian style is great)
1/4 cup finely grated Parmesan or sharp Cheddar cheese


1. Preheat the oven to 425 degrees.

2. Rinse and trim the broccoli into bite sized florets. Cut the stalk into 1/8-inch thick, round slices.


3. Place broccoli into a mixing bowl, and toss with olive oil, garlic, salt, and pepper. Set aside.


4. Spread the bread crumbs into a 13 by 9-inch metal pan and place into the oven for 2 minutes, or until lightly brown.


5. Remove from oven and add to the bowl with broccoli. Toss to combine.

6. Return the mixture the metal pan, spreading out the broccoli evenly.

7. Place in the oven and roast just until broccoli is tender, 8 to 10 minutes.


8. Remove from oven, and toss in the cheese. Serve.


Wednesday, August 8, 2012

Easy Fruit Parfait


This is a quick, easy, colorful, and healthy breakfast item! The yogurt and granola help keep you full and energetic right until lunch time.

Ingredients:

vanilla or plain yogurt
loose granola (I love granola mixed with dried cranberries and nuts)
some of your favorite berries: strawberries, blackberries, blueberries, raspberries
tall glasses


1. Chop the strawberries, blackberries, and/or raspberries. Mix together, layer at bottom of glass.

2. Spoon yogurt to make a second layer. If you choose to use plain yogurt, you may want to mix in a spoon of sugar before layering in each glass.

3. Layer granola.

4. Add one more layer each of fruit, yogurt, and granola.


Healthy and easy! If you're on the go, cut up the fruit the day before. In the morning, mix everything in a tupperware or to-go cup. 

Friday, February 3, 2012

Royal Icing

Once you have made your sugar cookies, you need to prepare an icing to decorate them with. Royal icing is great because it dries quickly and hardens, and you can therefore wrap the cookie in a nice plastic wrap for display. It is also easier to decorate in layers and put sprinkles on top. I wouldn't recommend regular cake frosting or buttercream frosting because it is more difficult to spread and doesn't dry quickly.


Ingredients: 

3 egg whites
5 cups powder sugar (confectioner's sugar or cane sugar)
flavored extract (optional)
water
parchment paper


1. Combine the powdered sugar with the egg whites a little at a time, and mix with a hand mixer for about 5 minutes.

2. You may add a teaspoon of flavored extract if you have it. I added almond extract.


(Royal icing is white; in this picture the yellow food coloring was already added)


3. The consistency of the icing should be like that of Elmer's glue. If it is too thick, add a little bit of water at time (about a tablespoon) until you reach the right consistency. If it is too thin, add more powdered sugar.

4. Separate the icing into smaller bowls and add food coloring.


5. The sugar cookie must be completely cool before you ice it. Spread icing onto sugar cookie using a butter knife with whatever color you want your base icing to be. Allow 30 minutes for drying. I used yellow for the ring and blue for the diamond. The darker you want the icing to be, the more food coloring you should add. You may need to mix the icing frequently as you ice the cookies, to prevent it from thickening. If it thickens too much, add a few drops of water.


6. Cut parchment paper into a perfect square, then cut into two equal triangles. Wrap parchment paper into a cone and fold inwards from the top of the cone to seal into place.

7. Fill parchment cone with icing, leaving about 3 inches room to fold and close off the cone from the top. If you overfill the cone, the icing will ooze out from the top when you squeeze it.

8. Pipe on outlines or designs onto your sugar cookie.


9. If you want to add sprinkles to your sugar cookie, pipe the design on your cookie, then add sprinkles.


10. Allow to dry completely. Wrap in clear plastic bags for party favors.


Sunday, January 29, 2012

Sugar Cookies

Sugar cookie dough is the best dough to use when cutting out shapes with a cookie cutter. When you make the dough, you need a recipe that will make the cookie keep its form, and not rise or expand. *Important*: Do NOT use Pillsbury ready made sugar cookie dough if you want to cut your cookies into shapes. They will expand and lose their shape. You need a dough with more flour in it! I tried taking the short cut and found out the hard way. I cut out 30 cookies with Pillsbury dough only to find that the dough did not keep its form. This was for my best friend's bridal shower, and boy can you say I was stressed out. Good thing I started 3 days ahead of time.


Here is the recipe the cookie cutter shop gave me: (Check out their cookie cutters, they are amazing!)


Ingredients:

2 Cups Flour
1/4 Tsp. Salt
3/4 Cup Sugar
1 Egg
3/4 Cup Butter
1 1/2 Tsp. Vanilla


1. Combine flour and salt, set aside. In a large mixing bowl, cream butter and sugar.

2. Add egg and vanilla, beat until well mixed.

3. Add flour, blend on low until combined, do not overmix.


4. Form dough into a log, wrap in plastic wrap and refrigerate for 1 hour until firm. If dough is too sticky or flimsy to form a log, stick it in a glass bowl and cover with plastic wrap.


5. On floured surface, roll dough out to 1/4" thickness. It may help to sprinkle dough on the rolling pin as well.


6. Cut dough with your favoritecookie cutters. The theme of the bridal shower was diamond rings and bling, so I used a diamond ring shaped cookie cutter.


The dough needs to stay cool while you work with it, or else it'll become too soft and flimsy to pick up off the counter and put onto a baking tray. Keep the dough in the refrigerator and take out a small portion at a time to work with. You need to be able to work fast before it starts getting too warm, so if you feel the dough is not solid enough, put it back in the fridge and take out a fresh portion.


7. Place dough onto ungreased cookie sheets. The cookie cutter didn't have a hole in the middle to cut out a hole for the ring, so I used a plastic medicine bottle cap of just the right size to cut it out. I cut out the hole after placing it on the cookie sheet, otherwise it would have been too flimsy to transfer.


8. Bake in a 325 degree oven for 12 -14 minutes. Transfer to a cooling rack immediately.


If you roll out the dough nice and thin, this recipe can make about 60 cookies. I made about 50 cookies for the bridal shower, and I used the rest of the dough to make football helmet shaped sugar cookies for football sunday. It was Eid, the Giants and Ravens won, and the men loved it!


Stay tuned for the next post: Icing Sugar Cookies!